📌 Open Argument Mining Framework (oAMF)


oAMF is a modular open-source framework for end-to-end argument mining (AM). It enables researchers and developers to build and run customizable AM pipelines using a diverse set of modules. With over 15 AM modules and oAMF-compatible extensions—including audio transcription, argument structure visualisation, and evaluation tools—the framework offers extensive functionality. Developers can integrate new AM modules or modify existing ones to fit their needs. Additionally, oAMF supports multiple interfaces, ensuring accessibility for users with varying technical expertise.
✨ Key Features
- 🔗 17+ Open-Source AM Modules: Covering a broad range of argument mining tasks.
- 🖥️ Multiple Interfaces:
- Web Interface: Execute predefined pipelines directly from your browser.
- Drag-and-Drop Interface: Create pipelines visually with n8n.
- Python API: Define and execute pipelines programmatically.
- 🛠️ Modular & Extendable: Easily add new modules that interact via the standardized xAIF format.
- 📡 Local & Remote Execution: Modules can be deployed locally or accessed as remote services.
📖 Table of Contents
- Installation
- Usage
- 📝 xAIF (Extended Argument Interchange Format)
- 📚 Available Modules
- 📦 Module Development
- 📜 License
- 📚 Resources
- 📖 Documentation & Tutorials
🛠️ Installation
To install the oAMF library, run:
pip install oamf
This package allows you to locally deploy and execute AM pipelines with integrated modules.
🚀 Usage
📂 Deploying and Loading Modules
Modules can be loaded from GitHub repositories (for local execution) or web services (for remote execution). See details of existing modules here 📚 Available Modules. Below is an example of loading and deploying modules:
from oamf import oAMF

oamf = oAMF()


""" Modules to Load

Specify the modules you want to load. You can do this in two ways:

1. **Using a deployed web service** – Provide the module’s web service URL.
2. **Deploying from a GitHub repository** – Provide the repository URL to deploy the module locally.

To achieve this, define the module’s URL, specify its type (`repo` for repositories or `ws` for web services), and assign a unique tag.

### Tags and Pipeline Construction
Tags are used later to construct a pipeline. If you need to use the same module multiple times within a pipeline, specify it multiple times with different tags.


Each module should be specified as:


(URL, type ['repo' or 'ws'], deployment route, tag)
"""
modules_to_load = [
    ("https://github.com/arg-tech/default_turninator.git", "repo", "turninator-01", "turninator"),
    ("https://github.com/arg-tech/default_segmenter.git", "repo", "segmenter-01", "segmenter"),
    ("http://targer.amfws.arg.tech/targer-segmenter", "ws", "targer-segmenter", "targer"),
    ("http://default-proposition-unitiser.amfws.arg.tech/propositionUnitizer-01", "ws", "propositionUnitizer-01", "propositionUnitizer"),
    ("http://bert-te.amfws.arg.tech/bert-te", "ws", "bert-te", "bert-te")
]


# Load and deploy modules
oamf.load_modules(modules_to_load)
🔄 Creating and Running an AM Pipeline
An AM pipeline is defined as a directed graph where each module processes and passes data to the next module. The pipeline is created using the tags specified during module loading. Here’s how you define and execute a pipeline:
# Define the pipeline using module tags
pipeline_graph = [
    ("turninator", "segmenter"),   # "turninator" outputs to "segmenter"
    ("segmenter", "propositionUnitizer")      # "segmenter" outputs to "propositionUnitizer"
    ("propositionUnitizer", "bert-te")      # "propositionUnitizer" outputs to "bert-te"
]

# Execute the pipeline using the defined workflow and an input file in xAIF format
output_path, xaif_result = oamf.pipelineExecutor(pipeline_graph, "example_input_file.json") # It writes the output to a temp file and also returns the xaif output
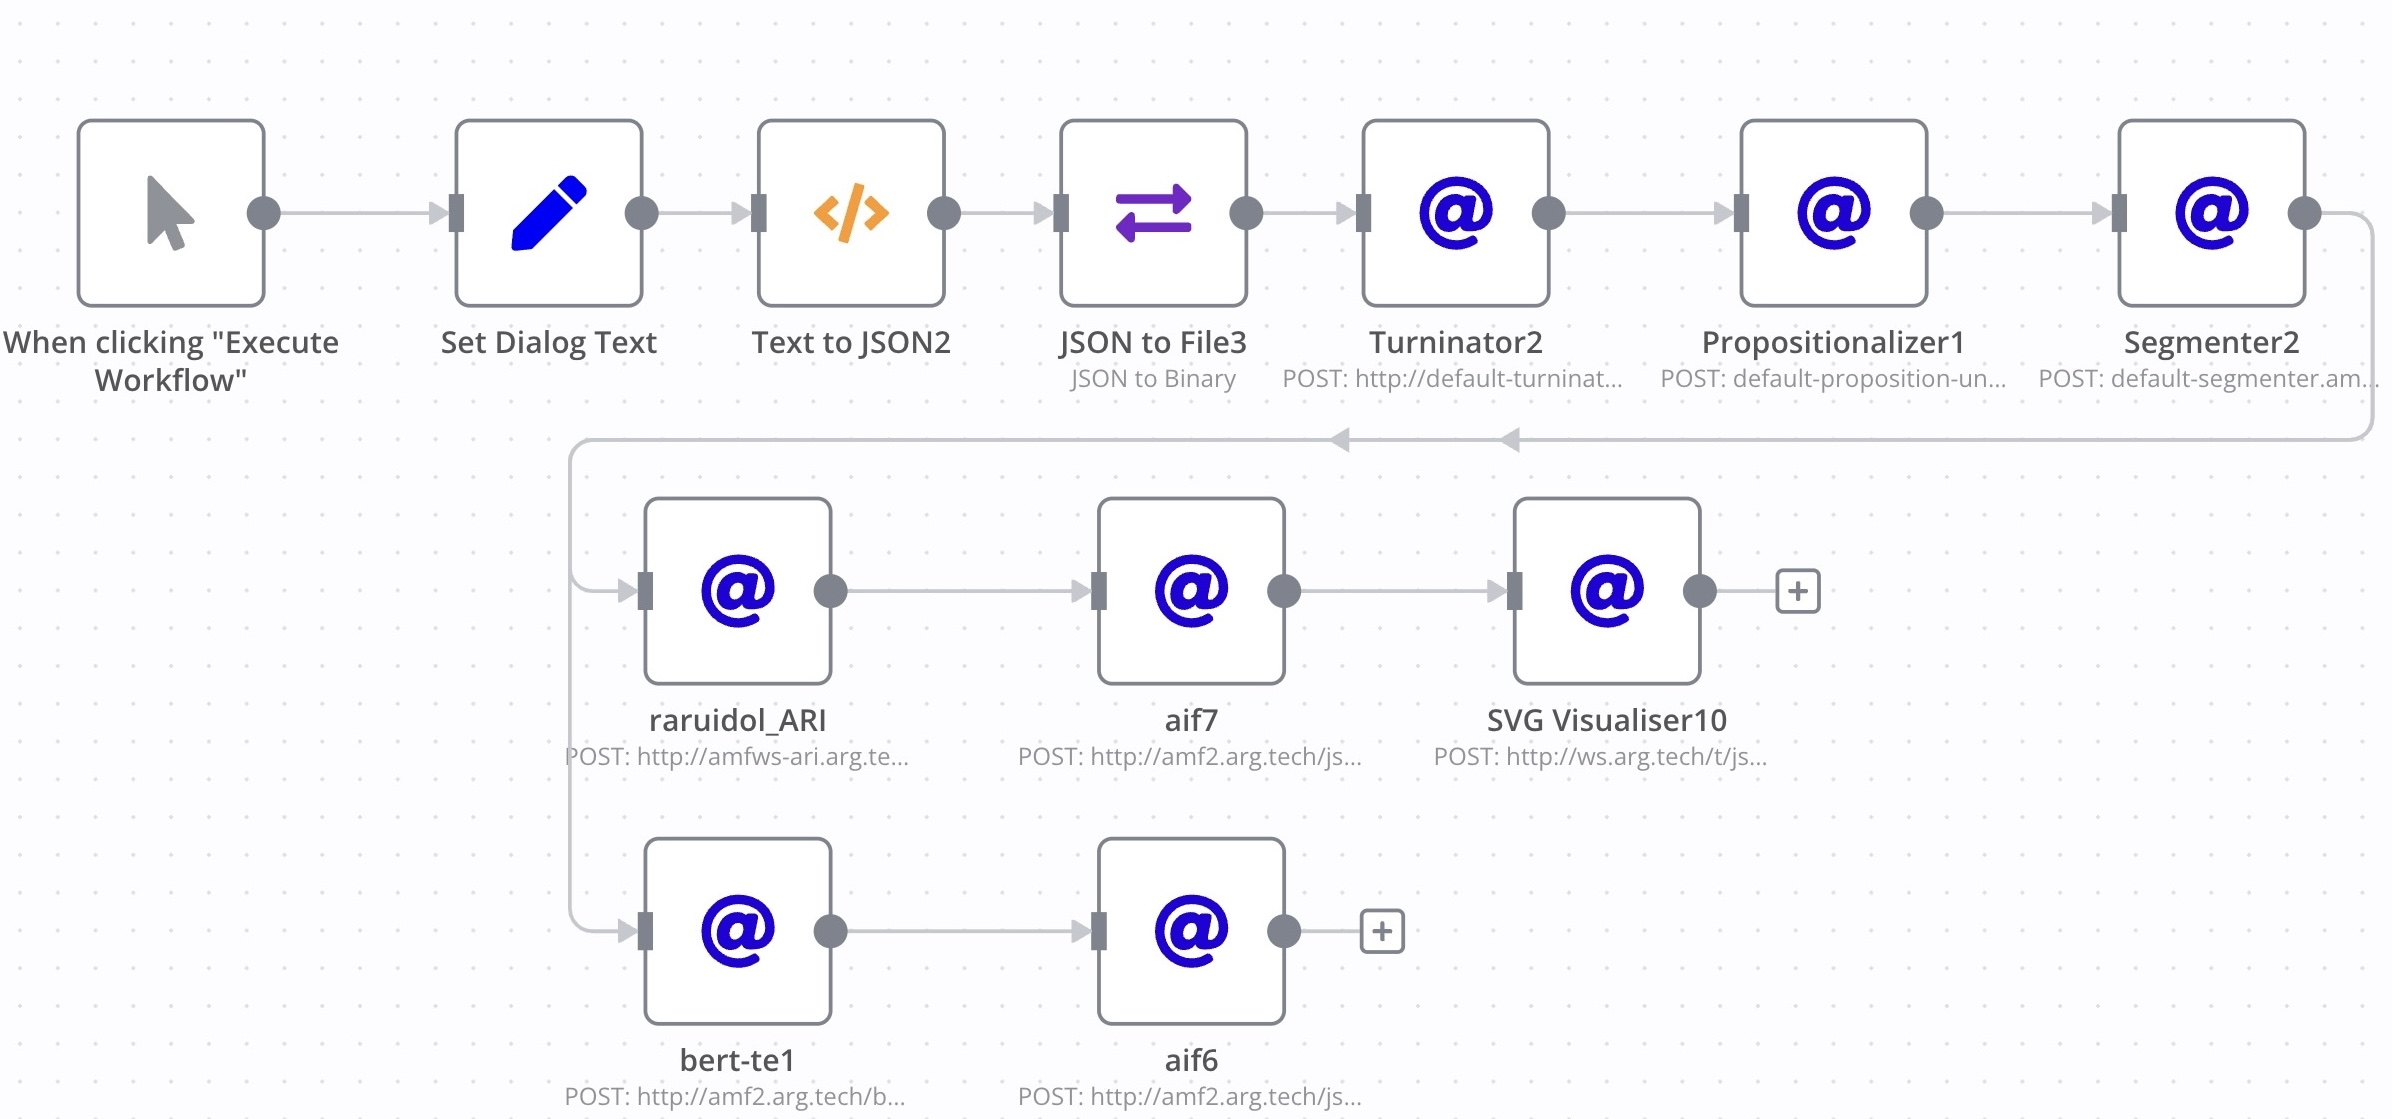
🖱️ Drag-and-Drop Interface
Users can create AM pipelines visually in n8n, a workflow automation tool. In this interface, modules are represented as nodes that you can connect and execute. Try it here. Login with email: oamf-user@arg.tech; Password: Password1
The workflow can also be exported as JSON and executed using the oAMF API. Example:
# Override the manually defined pipeline with one created using n8n (if applicable)
output_path, xaif_result =  oamf.pipelineExecutor(pipeline_graph, "example_input_file.json", "workflow_file.json")
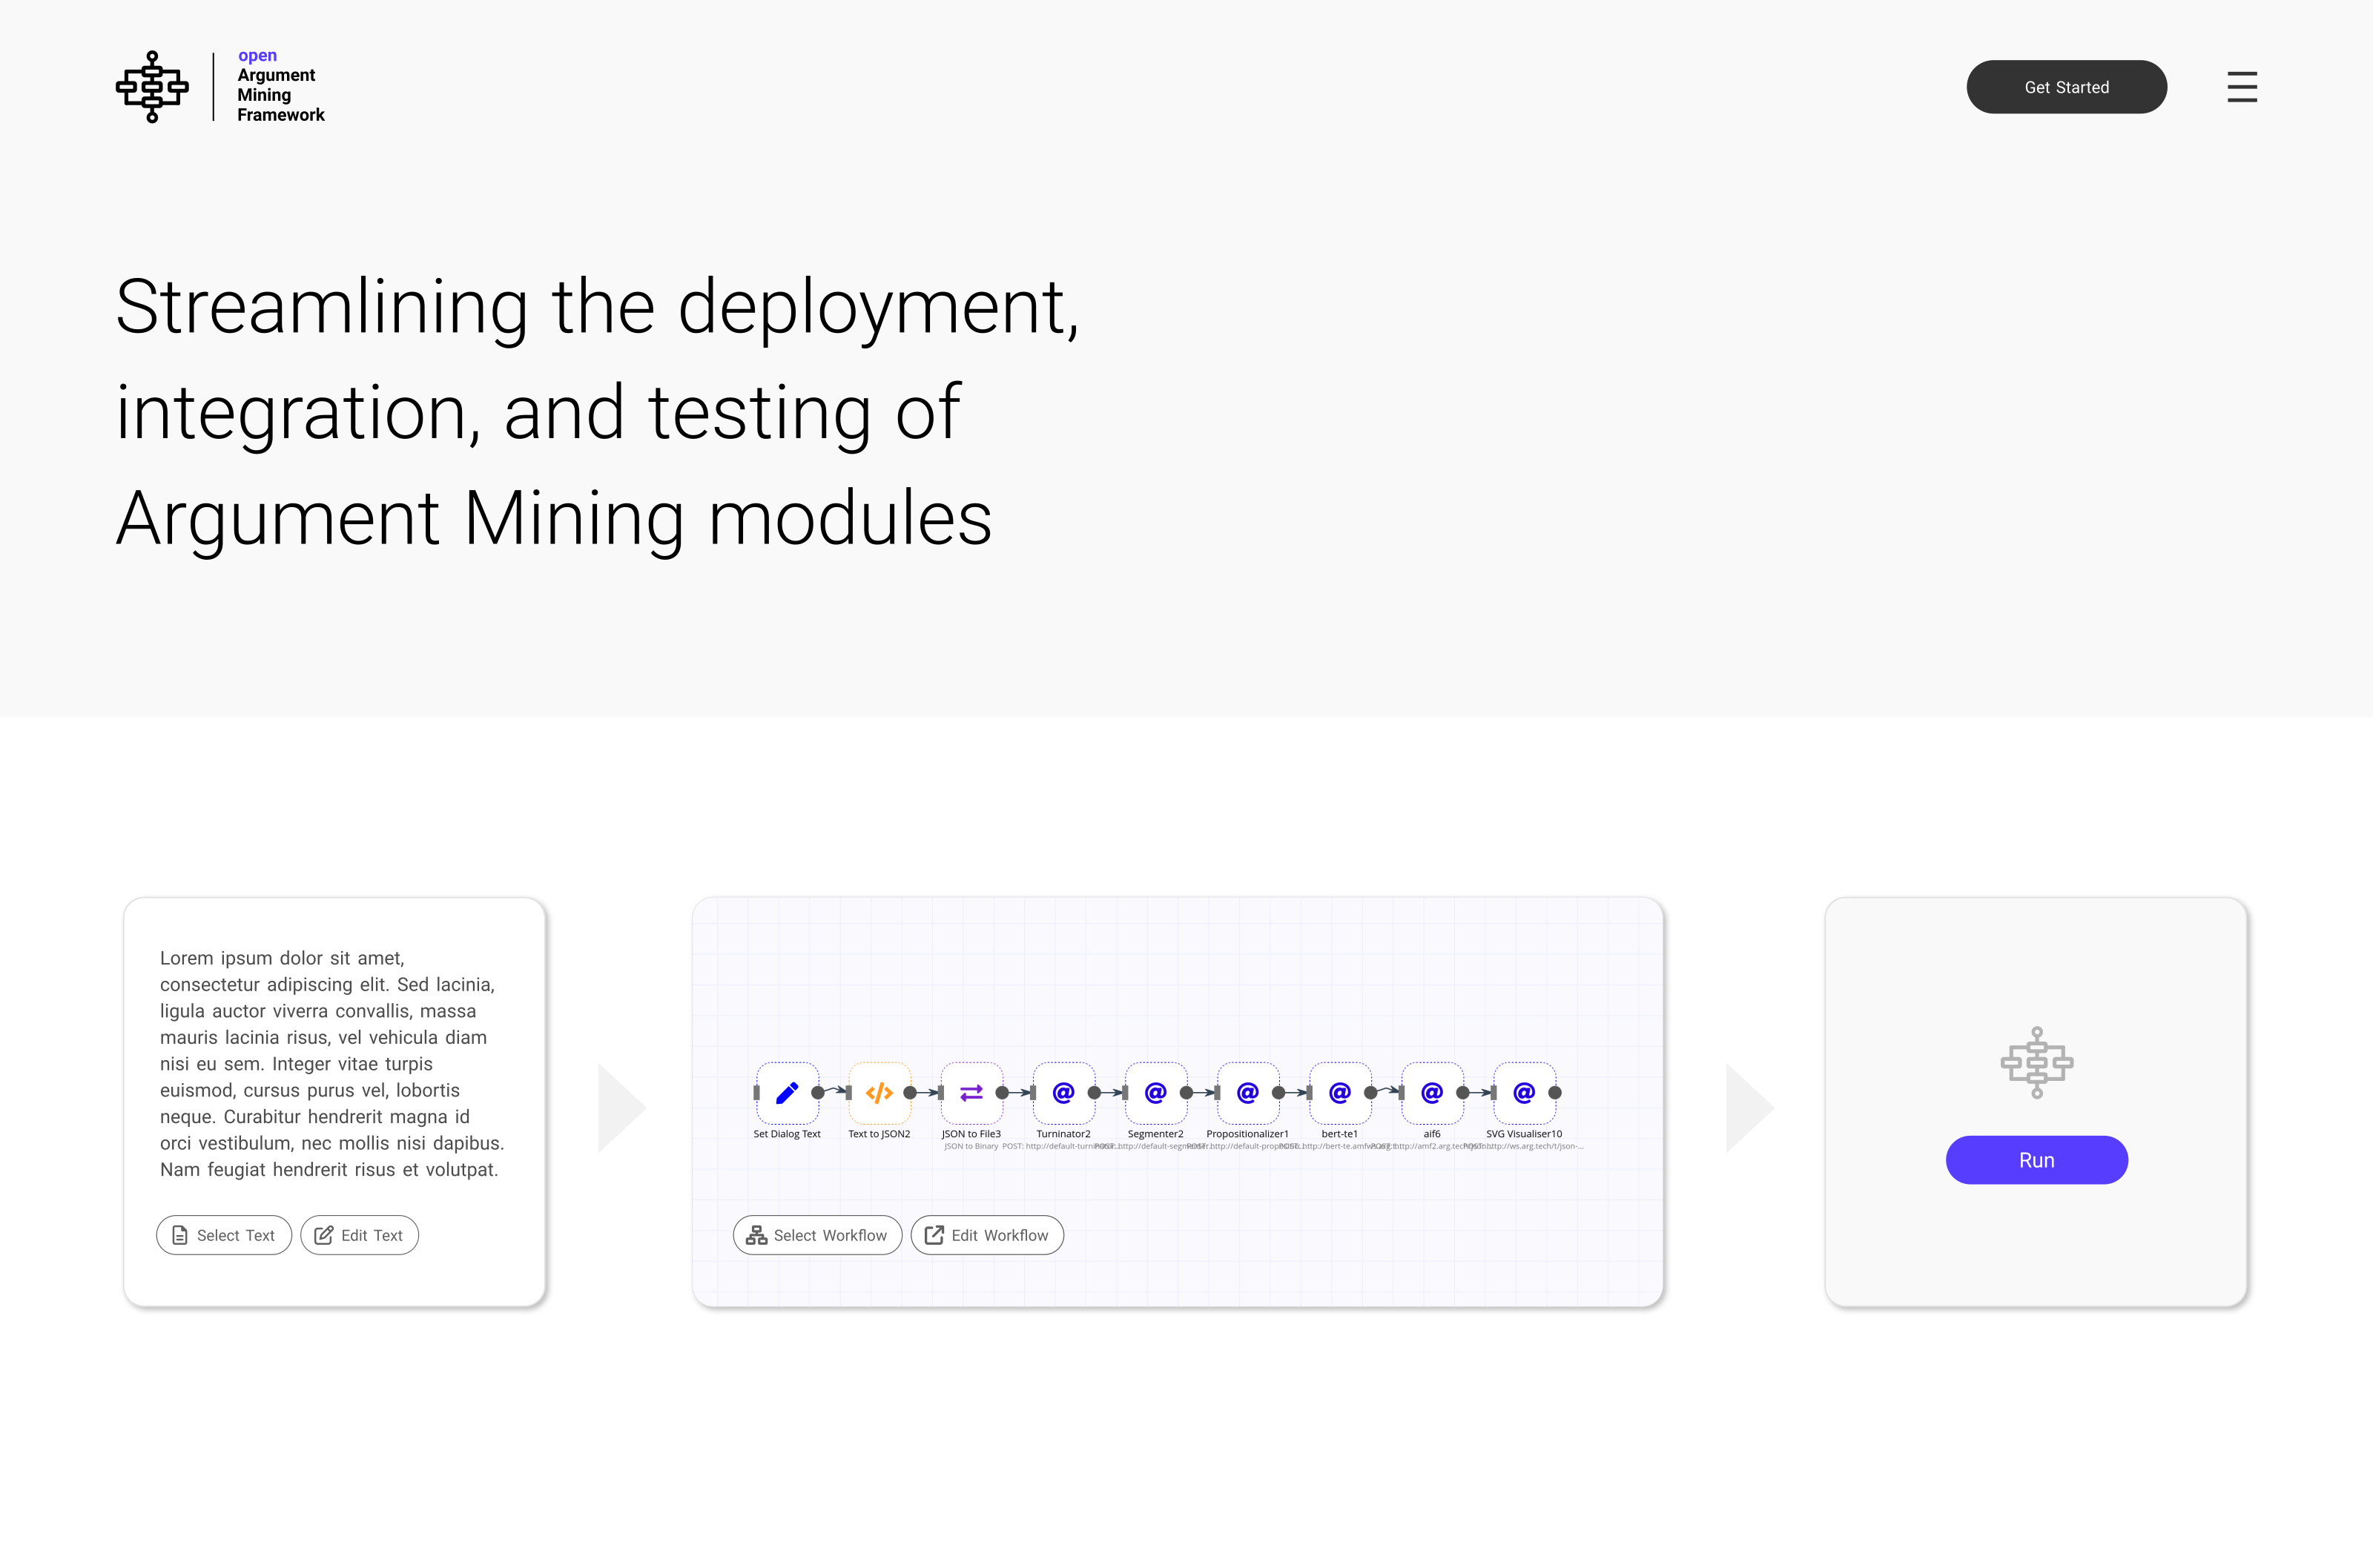
🌐 Web Interface
The web interface allows users to provide Input Text, select pipelines, and execute AM tasks without writing any code. Access the web interface here: oAMF Web Interface.
📝 xAIF (Extended Argument Interchange Format)
oAMF uses xAIF as the standard format for representing argument structures, ensuring interoperability between AM modules.
For a quick introduction to xAIF, check out the 📖 xAIF Tutorial.
You can also find the accompanying Python library here: xAIF Python Library. Example and more resources are provided below.
Below is an example of xAIF in JSON format:
# Sample xAIF JSON
aif= {
  "AIF": {
    "descriptorfulfillments": null,
    "edges": [
      {
        "edgeID": 0,
        "fromID": 0,
        "toID": 4
      },
      {
        "edgeID": 1,
        "fromID": 4,
        "toID": 3
      },
      {
        "edgeID": 2,
        "fromID": 1,
        "toID": 6
      },
      {
        "edgeID": 3,
        "fromID": 6,
        "toID": 5
      },
      {
        "edgeID": 4,
        "fromID": 2,
        "toID": 8
      },
      {
        "edgeID": 5,
        "fromID": 8,
        "toID": 7
      },
      {
        "edgeID": 6,
        "fromID": 3,
        "toID": 9
      },
      {
        "edgeID": 7,
        "fromID": 9,
        "toID": 7
      }
    ],
    "locutions": [
      {
        "nodeID": 0,
        "personID": 0
      },
      {
        "nodeID": 1,
        "personID": 1
      },
      {
        "nodeID": 2,
        "personID": 2
      }
    ],
    "nodes": [
      {
        "nodeID": 0,
        "text": "disagreements between party members are entirely to be expected.",
        "type": "L"
      },
      {
        "nodeID": 1,
        "text": "the SNP has disagreements.",
        "type": "L"
      },
      {
        "nodeID": 2,
        "text": "it's not uncommon for there to be disagreements between party members.",
        "type": "L"
      },
      {
        "nodeID": 3,
        "text": "disagreements between party members are entirely to be expected.",
        "type": "I"
      },
      {
        "nodeID": 4,
        "text": "Default Illocuting",
        "type": "YA"
      },
      {
        "nodeID": 5,
        "text": "the SNP has disagreements.",
        "type": "I"
      },
      {
        "nodeID": 6,
        "text": "Default Illocuting",
        "type": "YA"
      },
      {
        "nodeID": 7,
        "text": "it's not uncommon for there to be disagreements between party members.",
        "type": "I"
      },
      {
        "nodeID": 8,
        "text": "Default Illocuting",
        "type": "YA"
      },
      {
        "nodeID": 9,
        "text": "Default Inference",
        "type": "RA"
      }
    ],
    "participants": [
      {
        "firstname": "Speaker",
        "participantID": 0,
        "surname": "1"
      },
      {
        "firstname": "Speaker",
        "participantID": 1,
        "surname": "2"
      }
    ],
    "schemefulfillments": null
  },
  "dialog": true,
  "ova": [],
  "text": {
    "txt": " Speaker 1 <span class=\"highlighted\" id=\"0\">disagreements between party members are entirely to be expected.</span>.<br><br> Speaker 2 <span class=\"highlighted\" id=\"1\">the SNP has disagreements.</span>.<br><br> Speaker 1 <span class=\"highlighted\" id=\"2\">it's not uncommon for there to be disagreements between party members. </span>.<br><br>"
  }
}
oAMF includes the xaif library, which allows you to create, load, and manipulate xAIF data structures. Example usage:
# Ensure you have the latest version of xaif (pip install xaif)
from xaif import AIF

# Sample xAIF JSON with 2 L nodes and 2 I nodes
aif_data = {"AIF": {"nodes": [
      {"nodeID": 0, "text": "Example L node 1", "type": "L"},
      {"nodeID": 1, "text": "Example L node 2", "type": "L"},
      {"nodeID": 2, "text": "Example I node 1", "type": "I"},
      {"nodeID": 3, "text": "Example I node 2", "type": "I"},
      {"nodeID": 4, "text": "Default Inference", "type": "RA"}
    ],
    "edges": [
      {"edgeID": 0, "fromID": 0, "toID": 2},
      {"edgeID": 1, "fromID": 1, "toID": 3},
      {"edgeID": 2, "fromID": 2, "toID": 4},
      {"edgeID": 4, "fromID": 2, "toID": 3}
    ],
    "locutions": [{"nodeID": 0, "personID": 0}],
    "participants": [{"firstname": "Speaker", "participantID": 0, "surname": "Name"}]
  },
   "dialog": True
}

aif = AIF(aif_data)  # Initialize AIF object with xAIF data
# Or create an xAIF structure from raw text:
# aif = AIF("here is the text.")

# 1. Adding components
aif.add_component(component_type="locution", text="Example L node 3.", speaker="Another Speaker")  # ID 5 assigned
aif.add_component(component_type="proposition", Lnode_ID=5, proposition="Example I node 3.")  # ID 6 assigned to I-Node
aif.add_component(component_type="argument_relation", relation_type="RA", iNode_ID2=3, iNode_ID1=6)  # Creating relation

print(aif.xaif)  # Print the generated xAIF data
print(aif.get_csv("argument-relation"))  # Export to CSV format
🔗 XAIF Library Resources
- 🛠️ GitHub Repository: XAIF Library Repo
- 📦 PyPI Package: XAIF on PyPI
- 📖 Tutorial: XAIF Tutorial
- 📓 Jupyter Example: How to Use XAIF in Jupyter
📚 Available Modules
oAMF includes a variety of argument mining modules, each designed for different tasks:
| Module | Input | Output | Web-Service URL | Repo URL |
|---|---|---|---|---|
DTSG |
Unsegmented text and no structure. | Text segmented into turns (i.e. contiguous text from one speaker in the case of dialogue; NOOP in the case of monologue). | http://default-turninator.amfws.arg.tech/turninator-01 | https://github.com/arg-tech/default_turninator |
DSG |
Unsegmented text; no structure. | Segmented text; structure containing L-nodes with IDs crossreferring to those in SPAN tags. | http://default-segmenter.amfws.arg.tech/segmenter-01 | https://github.com/arg-tech/default_segmenter |
TARGER |
Unsegmented text; no structure. | Segmented text; structure containing L-nodes with IDs crossreferring to those in SPAN tags. | http://targer.amfws.arg.tech/targer-segmenter | https://github.com/arg-tech/targer |
DSS |
Unsegmented text; no structure. | Segmented text; structure containing L-nodes with IDs crossreferring to those in SPAN tags. | http://amf-llm.amfws.staging.arg.tech/segmenter | https://github.com/arg-tech/oamf_llm |
DARJ |
Segmented locutions. | Resolve co-references in locution nodes. | http://cascading-propositionUnitiser.amfws.arg.tech/anaphora-01 | https://github.com/arg-tech/cascading_propositionaliser |
SPG |
Segmented text; structure containing L-nodes. | Segmented text; structure containing L-nodes anchoring YA-nodes connected to I-nodes. | http://default-proposition-unitiser.amfws.arg.tech/propositionUnitizer-01 | https://github.com/arg-tech/proposition-unitizer |
CPJ |
Segmented text; structure containing L-nodes. | Segmented text; structure containing L-nodes anchoring YA-nodes connected to I-nodes. | http://cascading-propositionUnitiser.amfws.arg.tech/propositionaliser-cascading | https://github.com/arg-tech/cascading_propositionaliser |
DAMG |
Segmented text; structure with I-nodes. | Segmented text; structure with I-nodes connected with RA and CA nodes. | http://dam.amfws.arg.tech/dam-03 | https://github.com/arg-tech/dam |
DTERG |
Segmented text; structure with I-nodes. | Segmented text; structure with I-nodes connected with RA nodes. | http://bert-te.amfws.arg.tech/bert-te | https://github.com/arg-tech/bert-te |
PDSCZ |
Segmented text; structure with I-nodes connected with RA nodes. | Segmented text; structure with I-nodes connected with RA nodes specified by pragma-dialectical scheme type. | http://amfws-schemeclassifier.arg.tech/schemes_clsf | https://github.com/arg-tech/AMF_Scheme_Classifier2 |
SARIM |
xAIF file containing the proposition nodes (information nodes) in argument. | xAIF file containing the input and new nodes (i.e., RA, CA) which are related relations between nodes, and edges information which are connected between I nodes throughout the relation nodes. | http://amfws-rp.arg.tech/somaye | https://github.com/arg-tech/AMF-RP |
ARIR |
xAIF file containing propositional argumentative nodes. | xAIF file with the complete propositional argument graph covering three argumentative relations (RA, CA, or MA). | http://amfws-ari.arg.tech/ | https://github.com/arg-tech/AMF_ARI |
TARGER-AM |
xAIF file containing propositional argumentative nodes. | xAIF file with the complete propositional argument graph covering three argumentative relations (RA, CA, or MA). | http://targer.amfws.arg.tech/targer-am | https://github.com/arg-tech/targer/ |
DRIG |
xAIF file containing the I nodes. | Segmented text; structure with I-nodes connected with RA, MA, and CA nodes. | http://vanilla-dialogpt-am.amfws.arg.tech/caasra | https://github.com/arg-tech/dialogpt-am-vanila |
DSRM |
xAIF file containing the I nodes. | Segmented text; structure with I-nodes connected with RA, MA, and CA nodes. | http://amf-llm.amfws.staging.arg.tech/relation_identifier | https://github.com/arg-tech/oamf_llm |
WSCR |
xAIF file containing I nodes and the RA between them. | xAIF file where the “Default Inference” relations have been replaced by a specific argumentation scheme (e.g., “Argument From Analogy”). | http://amf-schemes.amfws.arg.tech | https://github.com/arg-tech/AMF_SchemeClassifier |
PTCR |
xAIF file containing I nodes. | xAIF file with the “propositionClassifier” key containing the list of I nodes with one of the three types (i.e., Value, Policy, and Fact) assigned to them. | http://amf-ptc.amfws.arg.tech | https://github.com/arg-tech/AMF_PTC_VFP |
CASS |
Two xAIF files | F1 Macro/Accuracy/CASS/Text Similarity/Kappa/U-Alpha | http://amf-evaluation-score.amfws.arg.tech | https://github.com/arg-tech/amf-evaluation-score |
WSTT |
Audio Input | xAIF with the text field populated with transcription | http://realtime-backend.amfws.arg.tech/transcribe_whisper-0 | https://github.com/arg-tech/realtime-backend |
SV |
xAIF | SVG | http://svg.amfws.arg.tech | https://github.com/arg-tech/svg-visualiser |
📦 Module Development
To develop a custom oAMF module, you need to create a web service that is dockerized for portability and scalability. The module is built using the Flask framework. It accepts and outputs xAIF data, making it compatible with oAMF’s argument mining tasks.
Key Features of an oAMF Module:
- Web Service: The module exposes a set of HTTP endpoints to interact with the module through HTTP requests.
- Dockerized: The module is encapsulated in a Docker container, ensuring easy deployment and scalability. The container is configured using
Dockerfileanddocker-compose.yaml.
Project Structure
The project follows a standard web application structure, with the following key components:
-
config/metadata.yaml: This file contains essential metadata about the module, including the module name, license, version, and input/output specifications. It serves as the module’s configuration and is key for integration with other systems. -
project_source_dir/: This directory holds the core application code. It includes the Flask routes and the main logic of the module that handles requests, processing, and responses. -
boot.sh: A shell script responsible for activating the virtual environment and launching the application. It simplifies the setup and ensures that the application runs in the correct environment. -
docker-compose.yaml: Defines the Docker service and how the application is built and run within a containerized environment. Thedocker-compose.yamlfile should be configured to reflect the project’s repository name. For example, in the case of the bert-te module, the service name in the Docker Compose file should match the repository name.Example Docker Compose service configuration: ```yaml services: bert-te: container_name: bert_te build: context: . # Specify the build context dockerfile: Dockerfile # Specify the Dockerfile if it’s not named ‘Dockerfile’ ports: - “5002:5002” # Map port 5002 on the host to port 5002 in the container
Metadata Configuration (config/metadata.yaml)
The metadata.yaml file provides essential information about the module, such as:
Name: "Name of the Module"
Date: "2024-10-01"
Originator: "Author"
License: "Your License"
AMF_Tag: Your_tag_name
Domain: "Dialog"
Training Data: "Annotated corpus X"
Citation: ""
Variants:
  - name: 0 version: null
  - name: 1 version: null
Requires: text
Outputs: segments
Flask Application Routes
The Flask application defines the following routes:
- Index Route (
/): Displays the contents of theREADME.mdfile as documentation. - AMF Module Route: This route can be named according to the module’s function.
- POST requests: Used to upload an xAIF file and process it with the module logic. The response is a JSON object containing the updated xAIF data.
- GET requests: Provides access to documentation and metadata.
How to Develop an oAMF Module
To create a custom oAMF module, follow these general steps:
- Clone the NOOP Template: Start by cloning the NOOP template.
- Modify Metadata: Update
metadata.yamlwith details such as the module’s name, license, inputs/outputs, and other relevant information. - Implement Core Logic: Modify
routes.pyto define the core functionality of the module. - Integrate with xAIF: Use the
xaiflibrary to manipulate xAIF data according to your module’s needs. - Configure Docker: Set up the
Dockerfileanddocker-compose.yamlto ensure the module is dockerized for easy deployment. - Documentation: Update the
README.mdfile with instructions for using the module.
📜 License
oAMF is licensed under the Apache 2.0 License, allowing free use, modification, and distribution. For more details, see the LICENSE file.
📚 Resources
-
📖 Documentation & Tutorials: Read Docs GitHub Docs Jupyter Example - 🖥️ Web Page: Try it here
- 🖥️ n8n Demo: Try it here
- 🛠️ GitHub Source: oAMF GitHub
-
📦 PyPI Package: oAMF on PyPI